Thursday, 22 December 2016

Outlook Disconnected From Exchange Server 2016, 2013, 2010, 2007 Error – Fixed

Getting an error while starting Outlook, indicating that “The connection to the Microsoft Exchange server is unavailable. Outlook must be online or connected to complete this action”. This is a very common error that may occur in Outlook when connected to Exchange 2016, 2013, 2010, or 2007.

There are several issues for this error, so before deleting a profile (which is considered the most preferred solution to fix any Outlook error) or using a tool, you must try to find the exact reason for this error. There might be following reasons for this error:

  • An interruption in internet connection.
  • Wrong Exchange Serve settings.
  • Outage/server down problem.
  • Incorrect Outlook profile settings.

You must check if there is any issue as mentioned as above.

If you are still getting the same error, after solving the above issues, then you can try the following solutions:

1. Task Manager

  • Go to your Task Manager > Find Outlook in the Processes > Click on End Task > Restart your Outlook

2. Open Outlook Safe Mode

  • Windows + R > Outlook / Safe > Click on the File menu > Disable Add-ins
  • After Outlook is open in safe mode, remove Add-ons

3. Inbox Repair Tool

  • You can use inbuilt Inbox Repair Tool (scanpst.exe and scanost.exe) from Microsoft.

4. Repair MS Outlook

5. Run SFC Command

  • SFC, System File Checker is an inbuilt utility which is used to check system file corruption.
  • It can be run by: Start > Command prompt > Enter sfc /scannow
  • Note: there should be a space between sfc and /

6. You can also try to Remove Exchange Account from your profile and can add it back also, without deleting your profile.

7. Remove an Outlook profile and add it again.

You can do this by following steps:

  • Go to Control Panel
  • Select Mail
  • It will open a new set up window. Click on Show Profiles
  • Choose Add option to create a new profile. Select Always use this profile for the profile you are creating
  • A new window will be prompt. Enter your Microsoft Exchange credentials and to proceed further click on Next
  • You are done with a new profile

If the above solution is not resolving the issue, then try the next solution also.

8. Restart Microsoft Exchange System Attendant service.

  • Open the Run window, type services.msc and press Enter
  • Give location in the opened detail pane Microsoft Exchange System Attendant service
  • Start the service by right clicking on it. (If it is already started, then stop it first and start it again)

9. Install your Microsoft Office or Outlook again.

If the above-given solutions are not resolving the error, then you have to uninstall your Outlook or Microsoft Office and install it again.

Outlook Disconnected From Exchange Server 2016, 2013, 2010, 2007 Error – Fixed Clark Kent 4.5 of 5
Getting an error while starting Outlook, indicating that “The connection to the Microsoft Exchange server is unavailable. Outlook must be on...

Wednesday, 7 December 2016

PST File in Use By Another Application Error in Outlook - Resolved

Microsoft Outlook is used by most of the users to have a smooth communication and managing their personal information. It is the most significant email client application used by the corporate world. It is not only a medium of communication but also used to manage users personal information as well. In order to store different data files such as messages, notes, calendar, tasks, etc., Outlook uses PST file format. However, PST files easily gets corrupted, which leads to unexpected behavior in MS Outlook. If PST files exceed its maximum file size limit then also it can gets corrupted. If a user tries to access these corrupted PST files, it generates a different type of errors in Outlook data file. PST in use by another application is one such type of error that a user can face while working on Outlook with corrupted data files. Therefore, in this post, how to overcome such type of errors and how to recover PST file in Outlook are discussed.

Types of Error Messages

When a user tries to access Outlook data files (.pst), he may encounter the following error message:

OR

These are the two types of error messages that a user gets even if he has full permissions and access to PST file. Moreover, there is no password on the Outlook Data (.pst) file. This can also affect an Offline Outlook Data (.ost) file of Outlook also.

Why PST File in Use By Another Application Error Occur in Outlook

If a user faces such type of error frequently as he starts Outlook, then there must be reasons behind this. Therefore, in this section, all the possible causes of this error are discussed.

  1. Large size PST file, may lead to corruption in Outlook data file that results in such type of errors.
  2. Outlook data file (.pst) are corrupted or damaged due to some virus or malware attacks.
  3. If a user is having large size PST file, then it takes a long time to backup and meanwhile, some other user tries to access the PST file then he encounters ‘Outlook data file in use by another application’ error.

How to Resolve PST File Error in Outlook

In order to overcome PST file open in another program error, one can try the solutions mentioned below:

  • If a user constantly getting this PST file error, then he needs to stop the backup program.
  • If a user receives this error even after stopping the backup program, then PST file must be corrupted. However, there is need to repair PST file in Outlook.

Repair Corrupted PST File using SCANPST.EXE

Microsoft Outlook provides users an in-built utility names as Inbox Repair Tool or scanpst.exe to repair corrupted or damaged Outlook data file (.pst). It first scans the PST and then repairs it. It is the utility that can easily be used by the users to remove only low level of corruptions from PST files. There are various situations such as when it comes to repairing severely corrupt PST files, scanpst.exe fails. It is an effective utility but with limited features. Now, to overcome all limitations of scanpst.exe, the best solution is trusted third party tool.

Advance Solution to Repair Damaged PST File

In order to remove all type of corruption from PST file, one can use a trusted third party Outlook PST Repair Tool. It is the reliable and advance tool that repair all type data items such as emails, calendars, notes, journal, etc., in PST files. A user can use this tool to remove both minor and major level of corruption from Outlook data files. The software is designed in such a way that it recovers PST file even without Microsoft Outlook installation on the local machine.

Why use Outlook PST Recovery

To resolve PST file in use by another application error due to corruption in PST file, one can try this Outlook PST file Repair tool. It helps users in following ways:

  • It repairs all type of corruption from Outlook PST file without any problem.
  • One can use this tool to repair password protected corrupt PST file in Outlook.
  • Recover hard deleted Outlook emails also without any hassle.
  • A user can also export only selective emails after recovery using this tool.

Conclusion

How to resolve PST file in use by another application error in Outlook is one of the most popular searches regarding PST file error. After understanding the root cause of such type error in PST file, an in-built scanpst.exe utility of Outlook is suggested to resolve such type of error. As scanpst.exe has some limitations, therefore, to repair PST file with any type of corruption, a user can try Outlook Recovery. It is the most reliable method to resolve all type of errors from PST file.

PST File in Use By Another Application Error in Outlook - Resolved Clark Kent 4.5 of 5
Microsoft Outlook is used by most of the users to have a smooth communication and managing their personal information. It is the most signif...

Thursday, 1 December 2016

How to Fix Outlook Crashing Error in Remote Computer

Introduction

When Outlook is connected to a remote computer over a network, it usually results in Microsoft Outlook 2013 to crash while printing. There are several reasons affecting this kind of error. In this article, we are discussing the reasons for this error and tried to provide its useful solution.

Reasons & Solutions for Outlook to corrupt while printing

  • Reason 1: Outlook 2013 not supporting PCL 6
    Solution:Remove PCL 6 driver and install PCL 5 driver to make it work fine.
  1. Go to File
  2. Run as Administrator
  3. Server Properties
  4. Choose the driver tab to find & delete the printer driver
  • Reason 2:Due to problem in Outprnt file
    Solution:An outprnt file is printing style setting in Outlook. So close the Outlook and rename the Outprnt file to .old. It is located at:
    C:\Users\<user>\AppData\Roaming\Microsoft\Outlook
    Or you can simply right clicking on the email in your preview pane and click on print, in-spite of printing by opening a mail.
  • Reason 3:Hardware Graphics Acceleration improves the performance of Outlook. However, it also creates the problem in Older computer and causes blurred text and Outlook to hangs consistently.
    Solution: Disable the Hardware Graphics Acceleration to resolve the problem Follow these steps to disable the Hardware Graphics Acceleration in Outlook 2013
  1. Go to File
  2. Then Options
  3. Now go to Advanced
  4. Select Disable Hardware Graphics Acceleration

It is stored in the registry as follow:

HKEY_CURRENT_USER\Software\Microsoft\Office\15.0\Common\Graphics

DWORD: DisableHardwareAcceleration

Value: 1 to disable Hardware

Graphics Acceleration is located in Group Policy Editor from where administrators can disable it. It's located under the miscellaneous tab of the Microsoft Office 2013. From there select "Do not use hardware graphics acceleration".

  • Reason 4:When Outlook doesn’t have a DEP (Data Execution Prevention) exception and DEP is enabled on the server.
    Solution: Add Outlook.exe as a DEP exception or disable the DEP. To toggle the DEP ON or OFF, go to Trust Center in any office application. Trust Center can be accessed by:
  1. Go to File
  2. Select Options
  3. Choose Trust Center section
  4. Select the DEP setting option
  5. Click the checkbox, it will Enable or Disable the DEP

Note: DEP setting can also be changed through the registry key. O is to disable the DEP and 1 is to enable it for the DWORD value of EnableDEP key. It is located in registry key at
HKEY_CURRENT_USER\Software\Microsoft\Office\14.0\Outlook\Security

Conclusion:

The article discusses all the reasons and solutions to fix the crashing of Microsoft Outlook connected to the virtual machine. If the above solution doesn’t resolve the issue, then maybe the problem arises due to corrupted PST file. So try to run the Inbox Repair Tool to fix corrupted PST file. If it is not recovered then try to run SysTools Outlook Recovery Tool to completely recover the Outlook PST file.

How to Fix Outlook Crashing Error in Remote Computer Clark Kent 4.5 of 5
Introduction When Outlook is connected to a remote computer over a network, it usually results in Microsoft Outlook 2013 to crash while prin...

Monday, 28 November 2016

Simple ways to fix the Outlook Error: The action cannot be completed.

Introduction

When a new Exchange mailbox is setup with the Outlook a user have to come across an error stating:
The action cannot be completed.”
while adding multiple numbers of recipients from the address book.

Scenario

Outlook is repeatedly showing an error when I try to add a multiple numbers of recipients from the address book. The error displayed is as follows:
The action cannot be completed.”
The above error appears in all versions of Outlook i.e Outlook 2010- 2013-2016. All these things are occurring after migrating to the updated local Exchange environment and shows after adding lots of recipient from the address book.

Reasons for the error:

There are various cause of the above error. Following are some of the important reasons resulting the above error:
  1. Address absent from the auto-complete list and added in the suggested contacts list. Since the suggested contacts folder is separated from the default contacts folder it causes problem in fetching contacts from the address list and result in showing such error.
  2. Due to incompatibility of credentials format with Microsoft Office.
  3. Contacts is manually configured to be hidden from Global Address List.
  4. The above issues sometimes arises due to problem with the Exchange Recipient Update Service.

Method to resolve the error:

Solution 1

The below methodology most effectively applies, when the user’s mailbox is not connected with other Exchange users.
  1. Go to Exchange Admin Centre
  2. Click on Recipients
  3. Now go to Mailboxes and browse the user
  4. Double click on the user account and unchecked the address list field
  5. Rebuilt a new Outlook profile, and hide the user account from the exchange after the successful login from the Exchange.

Solution 2

Firstly, be sure to check that the user’s mailbox is already present and ensure to match it with the same name. If it exists then follow then follow the below steps:
  1. Press Windows+R
  2. Type ADSIEdit.msc and press ENTER
  3. Right click on the ADSI Edit and choose on select a well known naming context radio button
  4. Choose on Default naming context
  5. Browse the user having no issue in his profile, then go to OU having user account and find the folder.
  6. Right lick on the user’s folder and click on properties
  7. Locate the attribute displayed in the showInAddressBook and select it
  8. Now click on Edit, it will open the Multi-valued String Editor and will display two entries
  9. Now copy the entry by from Value to add dialog box by selecting any one entry and then click on Remove. Now paste the text in the Notepad as it will be needed afterwards for the value to the account having problem.
  10. Now repeat the same steps as above for editing Multi-valued string for the second entry
  11. Browse the OU having the issue
  12. Locate the user account folder from the OU and right click on it, to select Properties
  13. There you will find showInAddressBook attribute having no value set. So Outlook is unable to locate the user account.
  14. Double click on the showInAddressBook attribute.
  15. Paste both the value passed in the Notepad earlier starting with “CN=All Users and CN=Default Global Address List in value to Add field of the Multi-valued String Editor.
  16. Click twice on OK and exit from the ADSI Edit console
  17. Now recreate the user’s Outlook profile. And check if the bug is resolved

Solution 3

If the above solution didn’t work then something is wrong with Auto-discover process.
  1. Use manual setup process to bypass Autodiscover. Confirm to configure the Exchange proxy settings.
  2. Reconfigure the Mail profile with turning off the caching. After connect back to exchange turn On the caching again.
Simple ways to fix the Outlook Error: The action cannot be completed. Clark Kent 4.5 of 5
Introduction When a new Exchange mailbox is setup with the Outlook a user have to come across an error stating: “ The action cannot be c...

Thursday, 24 November 2016

Microsoft Outlook is unable to add Gmail Account

Introduction

With the increasing number of Cybercrime activities and hacking, Google always serves best in terms of improving the securities of their users. It is always concerned about the security of their user. So being the product of Google, the securities in also Gmail is also enhanced. Some devices and applications use insecure sign-in technology to access the user data. So to maintain the security hierarchy Google need permission from their users on using google services on less secure applications like Outlook or any other application. If the less secured application is not permitted by the user then the security setting in Gmail shows the following error with Microsoft Outlook and other email clients.

Scenario

I am having the problem with Outlook. I connect Outlook as an email client. It is because my IMAP server in is declining to use outlook to access Gmail and refusing it as an email client. The error I am getting as below :

Your IMAP server wants to alert you to the following: Please login via your web browser:

https://support.google.com/mail/accounts/answer/78754 (Failure)

Hope to get it resolved ASAP.


Resolution

There are various solutions recommended by Google. Basically, these issues arise when the Microsoft Outlook or other email clients tries to sync to a Gmail account and Basic Authentication is not activated in the Gmail account of an individual. It needs to be enabled because the preferred email client must not be supporting latest security standards.

To fix the above error, the users have to change few setting and allow less secure apps to access the Gmail account. It will enable the Basic Authentication in Gmail account. It allows the less secure apps to access the Gmail account.

To do this the user has to go through the below link and click on enable radio button.

https://www.google.com/settings/security/lesssecureapps


Alternate Solution

There is some resolution to the above error. To do this there is some workaround you need to follow:

  1. Remove the user account from Microsoft Outlook, and close the Outlook after removing the account.
  2. Now Sign into the Gmail account
  3. After that go to Settings and check that the IMAP is enabled. It can be done by going through Forwarding & POP/IMAP tab.
  4. Go to security settings and generate the password for the new App or click on the below link to enable "less secure" app
    https://www.google.com/settings/security/lesssecureapps
  5. Now try to manually configure the Outlook account.

Conclusion

The above resolution discusses the method to connect outlook with Gmail. After allowing Gmail to access the less secure app and configuring Microsoft Outlook by manual method, the user can have this error resolved. If the Outlook in not working instead of the suggested workaround then maybe something is wrong with Outlook PST file. So the user needs to run Inbox Repair Tool to resolve the issue.  

Microsoft Outlook is unable to add Gmail Account Clark Kent 4.5 of 5
Introduction With the increasing number of Cybercrime activities and hacking, Google always serves best in terms of improving the securities...

Monday, 3 October 2016

Fixed : Send or Receive Error 0X800CCC0F in Outlook 2010

Microsoft Outlook being in continuous use for communication purposes in organizations and personal use has had surfaced issues more than a couple of times. This is one of those times where the client surfaces send or receive Outlook 2010 error 0x800CCC0F code due to functional defects of the internet connectivity. Thus, the profile is unable to reach the server leading to an interrupted communication procedure. The following segment deals with talking in detail about the problem and solution applicable for resolving it. An additional set of precautions have also been outlined to help users avoid similar issues in future.

Learn More About Microsoft Outlook 2010 Error 0x800CCC0F

Only thing common all the errors in the technological world are that they are all annoying. On receiving an error, all we want to do is to get rid of it as soon as possible. However, without understanding the problem, it is nearly impossible to fix it.

The discussed error here is one that arrives on a client machine when a send / receive procedure is carried out on Outlook. This error generally arrives on a client machine during the exchange of SMTP based email message(s).

Just like any other error message, even Microsoft Outlook error 0x800CCC0F does not appear on your screen with a warning beforehand. Therefore, at first you may not have any idea about it.

Error Occurrence: More than just a couple of reasons could possibly be responsible for the occurrence of the discussed error. A list of some possible causes has been mentioned below:

  1. An interrupted network or internet connectivity
  2. MS Outlook blocked by Windows firewall
  3. Profile settings on Outlook are incorrect
  4. Profile data file is probably corrupt / inconsistent
  5. Server settings for the account may be incorrectly configured
  6. Email protection is enabled causing

Tackling With Outlook 2010 Send and Receive Error 0x800CCC0F

An error with different causes is resolvable using different workarounds each. Therefore, the following segment lists a solution applicable on each of the above-specified error:

  1. Fix Network Issues: Troubleshoot network connectivity as the first step to fixing send / receive problem in Outlook. Open web browser to ensure network connection and troubleshoot if required by rebooting WiFi router or reconnecting Ethernet cable.
  2. Disable Firewall & Anti-Virus: On Control Panel, go to Network Connections and right click on the preferred internet connection in use. In the Properties option switch off Firewall from the Security tab. Otherwise, you can manually add incoming & outgoing server names in the account by accessing Outlook Account Settings. In Account Settings, click on Change to modify the information provided and add server details for the profile and finish.
  3. Recover Outlook Data File: Running the repair tool by Microsoft could probably prove the right solution for your case if nothing else worked in your condition. As a last resort, try recovering the data file using inbuilt Inbox Repair tool or a third party recovery solution.
  4. Outlook Safe Mode: Disable the unnecessary or troublesome add-ins in your profile by running Outlook in safe mode using - outlook.exe/safe command in the Windows search.

Know how to run Microsoft Outlook in safe mode: http://www.msoutlookware.com/basic-tips/outlook-safe-mode.html

Observation:

Stated above are some of the possible issues that may be happening in your case because of which your client may report the Microsoft Outlook error 0x800CCC0F. However, apart from the suggested solutions, if an outcome is not yet received then the use of a third party Outlook PST Recovery tool can be implemented.

Fixed : Send or Receive Error 0X800CCC0F in Outlook 2010 Clark Kent 4.5 of 5
Microsoft Outlook being in continuous use for communication purposes in organizations and personal use has had surfaced issues more than a c...

Monday, 26 September 2016

Manually Import PST to Office 365 | Free How-to Guide

Looking for the best way to manually import pst to Office 365? Already executed import service and still stuck? Well, then you are in right place today. Learn quick and easy ways to import pst files to Office 365 step by step manually. Before that, I would like to highlight the clear confusion between PST and Office 365. 

Understand the Difference Between PST File and Office 365


PST File:
 A PST or .pst (Personal Storage Table) is a file extension for a Microsoft Outlook email client. It allows its users to access items of multiple accounts configured to Outlook by a personal Outlook data file to each individual user. After you’ve configured any account to Outlook, when a new item appears, it will always save that information in .pst file format.

Office 365: As compared to MS Outlook (a desktop-based application) Office 365 is a web-mail Outlook and hence it is popularly referred to as OWA- Outlook Web Access. Any new items appear in Office 365 will be saved to its server and can be accessed through the server only over the internet.


Instant Solution: Download Office 365 Import PST Tool to directly import multiple PST files into Office 365 user accounts including emails, contacts, calendars, and tasks without losing any data.


Table of Content:

How to Manually Import PST to Office 365 - Free Ways

Here, we will be discussing 2 manual ways for importing .pst file into O365 mailbox: 

  1. Using Import/Export Wizard of MS Outlook - For Single User Only 
  2. Using Import Service to Directly Import PSTs Via Admin Center

Method#1: Importing a .pst File into Office 365 Using MS Outlook

  • To import Outlook PST data to Office 365, you’ll actually need to use Outlook. Firstly open your Office 365 and create an account as an administrator.
  • Now sign into Office 365 as other user and add (configure) Outlook Profile into it.
  • Once you are signed in as other user, you’ll be able to see and add other users mailboxes too.
  • Click on File >> click on Import and Export >> click on Next.
  • Select Outlook Data File (.pst) >> click Next >> click on Browse to provide the storage location of your PST file.
  • Just below the Browse button, under Options, you’ll see three sub-options, choose Do not import duplicates.
  • Click Next >> if you’ve encrypted your PST file with password, then you’ll be asked to provide them >> enter the correct password and click on OK button.
  • And if the PST file is not locked with any password, then after you click Next, a pop-up box will appear asking you to choose the folder to import from. Here you can select the Inbox folder or any folder which are available in your Outlook mailbox.
  • After you’ve chosen the folder to import, check the box pointing to Include subfolders.
  • Just below the Include subfolders, you’ll see two options: Import items into the current folder and Import items into the same folder in >> select the box pointing to Import items into the same folder in
  • After you’ll done all the above steps successfully, click on Finish to complete the procedure.

Limitation of Manual Method 

With the manual solution, if you’ve fewer items in your .pst file then it can be easily imported to Office 365. But in the same import process, when their size is large then the manual procedure may take more time than required.

Method #2: Using Import Service

The Import service in security & compliance of Admin Center allows to bulk import PST to Office 365 user mailbox. There are two ways to use Import Service for the job: 

  1. Network Upload: This service allows you to upload your .pst files to a temporary Azure Storage in Microsoft Cloud. Then use the Office 365 Import Service to manually import PST to Office 365 user mailbox in your organization. This method is quite complex and can be operated via Admin only. To know how import service works, click here
  2. Drive Shipping: If you don't want to go through the hassle of technical stuff, then drive shipping is the alternative to Network Upload. Here, you need to copy the PST files into a bit-Locker encrypted hard drive and then physically ship the drive to Microsoft Data Center. The rest of the work will be done by Microsoft's team and they will charge $2 per GB of PST file. To know how drive shipping works, click here

Why You Shouldn't Use Manual Method?

Although the manual ways to import PST to Office 365 are free of cost and don't require you to spend a penny, a user requires higher technical skills and expertise to make the job done. 

In the case of a single pst import, it can be directly done with the help of MS Outlook application. But, this task is best suited when the number of pst file and number of user is only one. 

Whereas, techniques such as Drive Shipping are not at all free. We cannot say it is a manual technique, it is more a paid service from Microsoft. And it is not at all recommended to use, because every time when you need to do the job, you need to perform all costly and time taking steps again and again. 

Then what to do?

It's simple, take the help of advanced and specially designed software that doesn't require any technical knowledge and doesn't cost much to complete the job. 

Import PST Files Into Office 365 Via Automated Tool

To overcome the hassle of synchronization and manually uploading PST files in each account, it better to take help from a professional tool. Using an automated tool users can import important data by filtering the unwanted data from Outlook. As the tool offers a category and date-range filter option, it can be used to filter the data that only need to be imported from the PST file to Office 365. One such solution is mentioned below.

Using the automated tool, the user doesn't require an Admin account id or password to import data into its own account. The tool offers the option to import single/multiple PST files directly into Office 365 user mailbox at once. And, there is no limitation on the amount of PST file data that can be imported using this utility.


Tips: User can import PST file into Shared Mailbox using Office 365 Admin Account. 

5 simple steps to import PST to Office 365 (Not Manually):

Step 1: Download and Launch the Office 365 Importer
Step 2: Enter Office 365 account credentials for login (click on 'Is Admin' to login as Admin)
Step 3: Click on Add File(s) /  Folder option to import Outlook PST file
Step 4: Select the Category of data to import & Apply the date-range filter.
Step 5: Set Additional filters and click on Import button.

Following are the instructions with screenshots: 
  • To start the import process, first login into the tool by using 'Is Office 365 Admin'
Note: Without Admin credentials login requires user account Id and password during authentication. 


  • Use the Add File(s) and/or Add Folder option to import .pst file path into the tool
  • To map the pst file with the designated Office 365 account, either do it manually from tool UI or create a mapped CSV file and upload it via the "Add CSV" option.
  • Select the accounts using checkbox and authenticate them. Once the authentication is finished, click on the Next button. 
  • From the next window, select the categories of items to import from .pst file and also set a date-range filter for each.

  • Set the Include Folders (if required) and Additional Filters such as:
    • Attach Outlook PST File
    • Exclude Deleted Items
    • Incremental Import
    • Exclude Sent Items
  • Finally, hit Import button to begin the process 


  • The tool will import PST to Office 365 user mailbox and once done, it will show you the status as completed and the option to Save Report.

Conclusion

We aren't biased with any particular method, it has been observed via genuine reviews that users are satisfied with the method to manually import pst to Office 365 when the pst file size is small. However, as the number of Office 365 users increases, it becomes quite difficult to work with a manual solution. In that case, the user prefers an automated tool to directly import multiple .pst files into multiple Office 365 user mailboxes simultaneously. 
Manually Import PST to Office 365 | Free How-to Guide Clark Kent 4.5 of 5
Looking for the best way to manually import pst to Office 365? Already executed import service and still stuck? Well, then you are in right...

Monday, 5 September 2016

Free Tricks to Migrate/Convert IBM Lotus Notes NSF To Outlook PST File

NSF files are the database files supported by IBM Notes and Domino Server. It stores the data in the “notes” form as a document unit. These files are used as a repository for emails, calendars, appointments, contacts etc. The NSF file formats can be viewed only from IBM Notes and its Domino server. However, other email clients do not support this file format and it becomes necessary to convert these NSF files into another file format such as PST format so that one can access them easily in MS Outlook. The content will be describing the manual tricks to migrate NSF to Outlook PST File Format.

Need for Conversion of NSF to PST

Email client Switching- One of the most common reasons behind file format conversion is that many organizations find it necessary to switch from one email client to another email clients due to unavoidable reasons. As one email client supports only its main database file, it cannot access any other file formats other than its own. Similarly, Lotus Notes generated NSF files cannot be accessed in other email clients like MS Outlook. Therefore, in order to view NSF files data, it is mandatory to migrate lotus notes to Outlook PST file format, making the content accessible in MS Outlook.

Manual Trick to Migrate NSF file to PST

The following manual procedure can help to migrate lotus notes NSF to Outlook PST format.

  • Launch IBM Notes application on system.
  • Open the required NSF database to export the data.
  • Under the Menu option, navigate File >> Export
  • Choose the location to store file.
  • Select either CSV format or Structured Text under Save As option.
  • Now, import the generated file in MS Outlook using import/export utility.

Limitations Faced By Manual NSF to PST Migration

The manual procedure discussed above has certain limitations to migrate lotus notes NSF file into Outlook, which makes it inefficient. The limitations include:

  • This trick can be used only to convert NSF contacts and email headers.
  • The complete email box, mainly the emails cannot be converted by this method.
  • It can be a tedious conversion methodology in case of bulk file content transfer.

Automated Approach to Convert NSF to PST

As stated above, the manual procedure does not give satisfactory results in migration of NSF file to PST file format. In order to have complete conversion done, an alternative approach should be considered. The conversion of NSF to PST can be done easily by downloading third party applications. One such software is NSF to PST migration, which allows user to migrate complete NSF file data including emails, contacts, calendars, etc. into PST format. Even the encrypted NSF emails can be converted into PST using this tool and it provides option to divide the larger PST into smaller PST’s for easy handling. The software is compatible with IBM 9.0 & all its below versions. In addition, interactive user interface has been provided by software making it easy for users to carry on process without any extra effort.


Free Tricks to Migrate/Convert IBM Lotus Notes NSF To Outlook PST File Clark Kent 4.5 of 5
NSF files are the database files supported by IBM Notes and Domino Server. It stores the data in the “notes” form as a document unit. These ...

Wednesday, 24 August 2016

How to Add Social Media Icons in Outlook Email Signature

Being an Outlook user, you can manage Outlook Data Items such as Emails, Contacts, Calendars, Tasks and Journals in a very managed way. One of the important feature that makes Outlook more reliable, is to add a Professional Signature in email. A well professional signature specifies a short introduction of your profession. It basically contains your name, designation, company name, company icon, and sometimes a link of your website. But apart from this, you can also add a Social Media icon like, Facebook, Twitter, etc. in your email signature. Here I’ll let you know the step by step procedure that will help you to link your Social Media Page through their icon in the Outlook signature.

Step 1: Download/Create a Social Media Icon of your Social Network Site

To download the icon, like for Facebook, write Facebook icon in the Google Search engine, right click the icon and choose Save image as… option. Similarly you can download the icon for all the social network website that you want to add.

Step 2: Link the icon in Outlook Signature

To link the media icon to your Outlook mail signature, there are two methods as shown as following:

Method 1: Add icon to an existing Signature.
Method 2: Adding icon by creating a new Signature.

Method 1: Steps to add icon to an existing Signature

  • After you’ve downloaded the icon, open your Outlook email client >> click on File >> click on Options >> click on Mail >> click on Signatures.
  • Select one of the existing signature, in which you want to include the Social Network icon.
  • Now to insert the icon in the signature, in the Edit signature section, click on “Insert image” button (See the screen shot).
  • Next it will ask to insert the picture, select the downloaded media icon and click on Insert. For reference see the icon of Facebook that I’ve inserted in the screen-shot.
  • Now select the icon by clicking your mouse on it >> click on “Insert link” button.
  • Enter the URL address of your social site page to link the icon with the required page >> now click on OK button to save the changes.

Method 2: Adding icon by creating a new Signature

  • Go to File section in Outlook >> click Options >> and click on Mail >> click on Signatures.
  • Click on New >> type a name for the signature and click OK (for example I’ve named a newly created signature as “Signature with Social Media Icon”).
  • After entering all the detail in Edit signature, click on OK >> now you’ll see a new signature by name “Signature with Social Media Icon” is added in the signature list.
  • Now you’ve created a new signature and you need to add an icon of your preferred social network site. To do that continue with the same steps described in Method 1.

After icon is added, continue with Step 3.

Step 3: Use signature in Outlook email after icon is added

  • Start your Outlook and compose a new email >> click on Insert.
  • In the Include section, click on Signature icon >> then click to insert the signature, in which you’ve just added the social media icon.

Conclusion

After adding the social media icon in your email signature, when you’ll send an email to any recipients. They will be able to see your social network page easily. You can also add multiple social account site icons by just following the above steps.

How to Add Social Media Icons in Outlook Email Signature Captain Ashish 4.5 of 5
Being an Outlook user, you can manage Outlook Data Items such as Emails, Contacts, Calendars, Tasks and Journals in a very managed way. One...

Saturday, 20 August 2016

Best Way to Convert Microsoft Outlook MSG file to Thunderbird EML

As you know that, when you drag and drop a particular message from MS Outlook to your Windows Explorer, it is always saved with MSG file extension. The MSG file is the part of Outlook PST file and can be only access on Outlook. So if you want to access these MSG file to other email client or any application, that doesn’t support MSG file. Then you need to move your MSG file to the required file format that is supported by that email client. For example if you want to export MSG file to Thunderbird, then you’ll need to convert MSG file to EML.

What is the Need To Move MSG File into other File?

In a situation, if you have multiple .msg files in your computer drive and want to open these files using Thunderbird, because you don’t have Outlook installed in your computer. So in such situation the .msg file needs to be converted into .eml file.
In another situation, if you’ve Outlook and Thunderbird both installed on your PC but there are few important details in your MSG file, that you want to access through Thunderbird. Then in this case also, you need to convert MSG file to EML.
Solution: There are two methods to convert your MSG file to EML. Here we’ll discuss both method one by one.


Method 1: Migrate MSG file to EML when Outlook and Thunderbird both are Installed

  • Drag and drop the MSG file to Outlook >> click on Save As >> provide the location where you want to save the file.
  • In the Save As type, select the file format: TXT and click on Save.

  • Right click on saved txt file and change the extension from txt to eml.

  • Now during you rename the TXT file with changed extension i.e. EML, you’ll see the below warning prompt.
  • Click on Yes and it will save your txt file as eml file.
  • Now to open the converted EML file, go to the location where you’ve saved the file. Right click on the .eml file, click on Open with and select Thunderbird email application.

Tip: If you want to convert Outlook PST data into EML, Try PST Converter Tool.

 
https://systoolskart.com/download/SYS1P0C0T/511

Method 2: Import MSG file to EML when Outlook is not Installed

  • Right click on MSG file >> select the option Rename.
  • Change the extension from MSG to EML. It will create a new EML file.
  • Right click on newly created EML file >> select Open with >> and choose Thunderbird. Now you can see the eml files in Thunderbird.

Follow These Steps to migrate MSG File to PST File

As to convert the .pst file from Outlook to .msg file, you use the drag and drop method, similarly you can do vice versa to convert .msg file to .pst. All you need to do is to open your Outlook as well as Windows Explorer and fit them on your computer screen in a manner so that you can easily see them your screen. Now drag the .msg file from Windows Explorer and drop it within Outlook.

Challenge You May Face with Manual Solution

  • You will get the warning prompt while converting MSG File to EML, as shown in the Method 1. Which says that the file may become unusuable. So, this is one of the challenge you may face with manual method.
  • In addition, it also doesn’t easily convert multiple MSG files in a batch using both Method 1 and Method 2, since the manual method is very lengthy.
  • With manual solution described in the Method 2, you cannot convert the MSG file that has Attachments or images in it.

Alternative Solution

If you have fewer number of MSG files to export into Thunderbird, then you can go through the above manual procedure but as I’ve also discussed the difficulties that you may face during converting the multiple msg files. So to get rid of these difficulties, you can try some of the powerful tool available in the market. Like the one I will recommend is PST to EML Converter. It will easily convert all the PST file including all the individual Outlook message with .msg file extension without wasting too much time.
Best Way to Convert Microsoft Outlook MSG file to Thunderbird EML Clark Kent 4.5 of 5
As you know that, when you drag and drop a particular message from MS Outlook to your Windows Explorer, it is always saved with MSG file ex...

Saturday, 13 August 2016

Repair OST File in Outlook 2010 with SCANPST.EXE Utility

OST files are used when an Outlook account is configured with Microsoft Exchange Server by enabling MAPI protocol. It allows user to work in offline mode where any changes made are synchronized with server when there is connection. As OST files are very prone of being corrupted, there are many issues associated with it. The inbuilt utility can be used to repair the files, but it is not so effective. That is why users are advised that they don’t repair OST file with scanpst.exe utility.

Issue in Inbuilt Repair Utility

Before MS Outlook 2010 version, Outlook comes with an inbuilt utility named scanost.exe to repair damaged OST files. However, it has been replaced by scanpst.exe, which can be used to repair both OST & PST files. In many scenarios, users could not fix the issues in OST files using this utility. Though it may work for minor error, it is not advisable to use with highly damaged OST files.

Rebuild OST file

Since the OST files contains only the cached data, it is better to create a new cache again instead of trying to fix the issue in OST file. The solution for the same problem is to rename the old OST file after closing the MS Outlook application and making the MS Outlook re-build the OST file from the Server again.

The default location of the OST files is listed below:

Windows Vista/7/8 and 10 -  C:\Users\username\AppData\Local\Microsoft\Outlook\

Windows XP -  C:\Documents and Settings\username\Local Settings\Application Data\Microsoft\ Outlook\

Go the destination location in the system where the OST files are present and open the folder location.

Repair OST file

The rebuild option may not be possible if the user has large-sized mailbox and there is slow internet connection. OST repair can be done by using scanpst.exe utility. User needs to locate the scanpst.exe for the Outlook version first. Then, run the repair process by locating the OST file and if there are minor problem, it will be repaired using scanpst.exe utility.

Using Third Party Tool

If user has a damaged or corrupt OST file and scanpst.exe cannot resolve the issues, the only reliable option is to use a third party tool such as OST Recovery. This efficient tool has the capability to convert corrupt OST files and its data items to a healthy PST file format without the presence of MS Outlook. It does not effect the original formatting of all items in OST intact after converting them to PST. The users can apply Mail Filter option to migrate only the desired emails.

Conclusion

In the blog, we have discussed that the OST files that are highly damaged cannot be recovered using the manual procedure of inbuilt repair utility. However, OST Recovery software can be used to deal with any OST file and recover the data in PST file format to make the contents accessible in MS Outlook.

Repair OST File in Outlook 2010 with SCANPST.EXE Utility Captain Ashish 4.5 of 5
OST files are used when an Outlook account is configured with Microsoft Exchange Server by enabling MAPI protocol. It allows user to work i...

Monday, 1 August 2016

Simple Steps to Recognize a Outlook PST file

Introduction:

When we try import our Outlook account to a new pc from the previous one, having different OS platform and try to copy the pst files with the profile info to the new one. It doesn't work and doesn’t recognize the Outlook PST file in this article we have discussed the same problem and guided you with a simple technique to resolve the problem.

Scenario :

"I installed office 2010 on the new computer and I am trying to open the .pst file from the hard drive of my previous computer and imported it to my  new system . I transferred the .pst file to the new computer. I then opened Outlook, went to ( File/Open/Open Outlook data File/Desktop/Outlook.pst ) but, i'm obtaining a panel pop open that says "The file C:\Users\Administrator\Desktop\Outlook.pst isn't an Outlook file (.pst)”
Well, i do know that it's a .pst file. it's 902 MB of data in it too! I even tried the scanpst utility, but it did not recognize it as being a .pst file either.
At now, I have no idea what to do to get Outlook to recognize this file.
Config new computer:
Windows 7
Office 2010
Config old computer:
Vista
Outlook 2010

Steps to do this?

Try to do the following steps:
  1. Right click on the copied PST file.
  2. Click on Properties and check if you get any option 'Unblock'.
  3. If yes click on it and then try to open the PST file in Outlook.
check if it helps.If you are able to see PST file in your system then.
  1. Export the PST file.
  2. Save it on the system
  3. Copy the exported PST file to the new system and then try to open the PST file in the new system.
  4. check if it helps.

To export the pst file:

1. Open Outlook


2. Click on File


3. Click on Open


4. Click on Import


5. Highlight Export to a File and click on Next


6. Highlight Outlook file (.pst) and click on Next


7. Highlight Inbox and click on Next


8. Browse to the location where you would like to save the file


9. Click on Finish

Conclusion: 

Running scanpst after following these step can completely resolve this issue and it will now recognize the PST file with quick and simple steps. If it cannot identify the PST file, the PST file might be beyond repair and is completely corrupted. Then you need to Run a 3rd Party software of Outlook Recovery Tool. which is efficient in recovering hard deleted Outlook Emails and also Repair pst file with both Minor as well as Major damage.
Simple Steps to Recognize a Outlook PST file Clark Kent 4.5 of 5
Introduction: When we try import our Outlook account to a new pc from the previous one, having different OS platform and try to copy the ...

Thursday, 28 July 2016

The Best Way to Recover a Deleted Distribution List

Introduction:

If you’ve dedicated a huge time span in maintaining your distribution list and accidentally that is been deleted that seems like a major Catastrophe and most interestingly in older versions of outlook (2003 and 2007) there were no warning message while Delete button was being pressed. So this article is based on some tips to Recover a deleted distribution list.

Steps to recover a distribution list:

If a distribution list is accidentally been deleted.
  1. Open Microsoft Outlook.
  2. Go to the "Mail".
  3. Click on  "Deleted Items" in the "Mail" window.
  4. Search for distribution list in the deleted items.
  5. Click on the distribution list and drag it to "Contacts" to restore the distribution list.

If distribution list is permanently Deleted:

Microsoft Office Outlook 2007 has a way to recover items even after emptying the Deleted Items folder. If it is connected with a Microsoft Exchange Server account. To do this follow these steps:-
  1. Open Microsoft Outlook
  2. Go to "Contacts" window by clicking on it
  3. Go to the "Tools" menu.
  4. Select "Recover Deleted Items"
NOTE: If "Recover Deleted Items" is not showing then Outlook account may not be setup on the Exchange Server. If you believe that it is, contact to the network administrator.

Conclusion: 

This procedure adds the distribution list to your main (default) Contacts folder. Your distribution list might be arranged according to the date it was created; in that case, scroll through the deleted items. And if the file is not recovered by the above methods   you can take help from a 3rd Party Software so that it can save your time and resolve your problem surely. One I would like to prefer is SysTools Outlook Recovery because it can Repair complete Outlook PST Data: Emails, Contacts, Calendar & more.

The Best Way to Recover a Deleted Distribution List Clark Kent 4.5 of 5
Introduction: If you’ve dedicated a huge time span in maintaining your distribution list and accidentally that is been deleted that seems...

Sunday, 24 July 2016

How to enable Phishing Warning in Microsoft Outlook


Phishing warning in Outlook is shown to you when the message contains some kind of bad contents  like malware links (Phishing links). The malware can contain messages that may ask about your personal information like your bank account details, etc. As being an email client user, you would receive an email telling you that you’ve chosen the lucky winner amongst thousands of people and at last you’ve asked to provide your account number and password to get the money in your account. This is nothing but spam messages and you should always ignore these kind of emails.

We’ve several big example of this kind of email spamming. To protect yourself from being spammed, MS Outlook has very important feature i.e. Phishing Warning in emails. To get the advantage of this feature, you need to enable this option.

Best manual solution to enable Phishing Warning in Outlook

  • Launch MS Outlook in your Windows >> when open click on Home.
  • Click on Junk to drop down its options >> click on Junk Email Options….

  • Under the Junk E-mail Options…, click on High: Most junk email is caught, but some regular mail can be caught as well. Check your Junk Email folder often.
  • Check the box to disable the option Disable links and other functionality in phishing messages. (recommended) and then click on OK.

  • After enabling the phishing warning for email, when you receive messages in Outlook with any kind of Phishing content like Phishing links, a warning will appear to let you know that the message is not genuine as same as shown below.
Error Message: This might be a phishing message and is potentially unsafe. Links and other links have been disabled. Click here to enable functionality (not recommended). Outlook blocked access to the potentially unsafe attachments: image001.gif.

Disclaimer: So when you ever receive any messages with above mentioned error messages then you should always ignore these kind of messages.
How to enable Phishing Warning in Microsoft Outlook Clark Kent 4.5 of 5
Phishing warning in Outlook is shown to you when the message contains some kind of bad contents  like malware links (Phishing links). The ...

Wednesday, 20 July 2016

How to Remove Duplicate Contacts in Outlook 2019 / 2016 / 2013 / 2010 ?

Are you worried due to the sudden syncing of Outlook contacts item? Well! Sometimes while importing contacts from multiple sources or while merging, you might have created Duplicate contacts in Microsoft Outlook.

Here, I will give you the easiest solution to delete duplicate contacts in Outlook 2016, 2013, 2010 and 2007. Simply download one of the safest and reliable application given below that helps you to remove duplicate contacts in Outlook:


Here are some important points, which our blog will cover:
  • Reasons behind showing duplicate Outlook contacts
  • How to remove duplicate Outlook contacts one by one?
  • How to delete Outlook duplicate contacts using Import/Export Wizard in bulk?
  • The quick solution to eliminate duplicate Outlook contacts.
Quick Tips- If you want to merge and remove duplicate Outlook contacts at the same time, then you can try SysTools PST Merge tool. This will allow you to remove duplicate contacts while merging multiple Outlook contacts into one.

Reasons for Duplicate Contacts in Microsoft Outlook 2019

The reason for the duplication of Contacts in MS Outlook can be due to following reasons:
  • While copying or moving contacts from one folder to another
  • While Synchronizing mobile contacts by Microsoft Exchange ActiveSync.
  • While Importing contacts from multiple sources.

How to Remove Duplicate Contacts in Outlook One by One

Let’s see the step by step process to delete duplicate contacts in Outlook 2019, 2016, 2013, 2010.
  1. Open Outlook & click on the People icon.
  2. Scroll your cursor in the Current view group and click on the Phone icon. This is one of the simplest way to see the duplicate contact items in Outlook.
  3. You will get the list of your duplicate contact items. Remove duplicate Outlook contact items manually by holding the Ctrl button.
  4. Press Delete, when selected all duplicates.

How to Delete Multiple Duplicate Contacts in Outlook by Export & Import Wizard

What happens when you have n number of duplicate contact items in Outlook? The above process will take a lot of time of a user as deleting contacts one by one can be tedious.

Now, to remove duplicate contacts in Outlook in batch, you can try the Export & Import method. In this you have to export your multiple Outlook duplicate contacts into a file, then import them in a new folder. Perform the following steps:
  1. Open Outlook and click on People tab.
  2. You have to make a new folder to import unique Outlook contacts items. For this, right-click on Contacts >> New folder
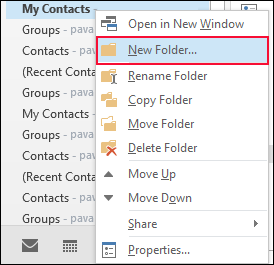
  3. Name your folder say ‘ContactDups’
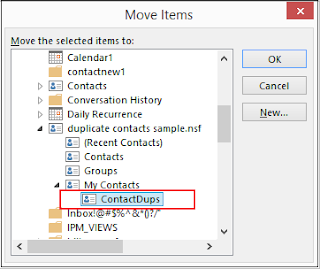
  4. Go back to the Contact folder & press Ctrl+A to select all Outlook contact items.
  5. Press Ctrl+Shift+V to move the items to your newly created folder ContactDups.
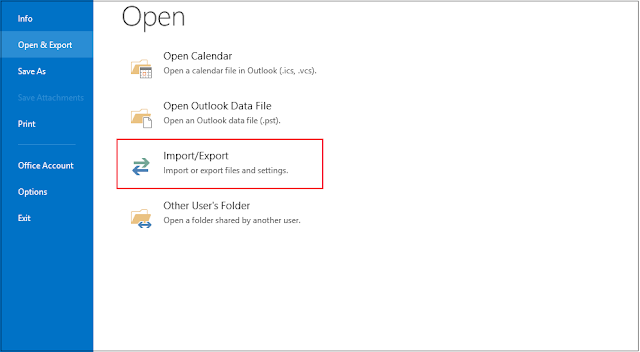
  6. Now go the File menu, Click Open & Export. Select Import/Export.
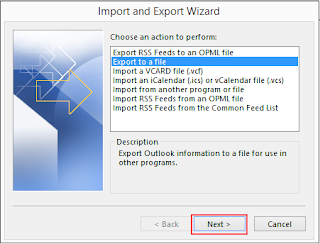
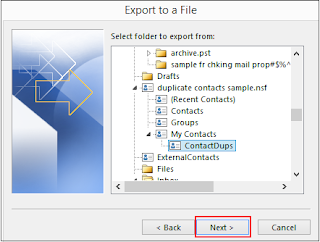
  7. Select Export to File
  8. Click on Comma Separated Values >>Next and select the folder which you have created in Step 3 i.e; ContactDups. Hit Next.
  9. Browse your desired location to save Outlook Contacts.
  10. Click Finish button to remove duplicate contacts in Outlook.

Importing Duplicate Free Contacts Get Back to Outlook

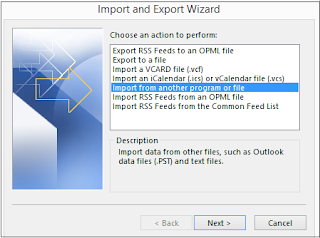
  1. Go to the File menu, click Open & Export. Select Import/Export.
  2. Click Import from another program or file.
  3. Select Comma Separated Values
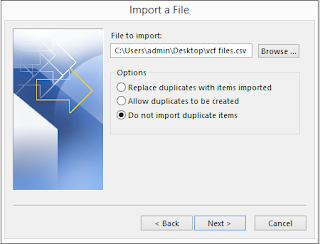
  4. Browse the file which you have created in the above steps.
  5. Select the option “Do not import duplicate items” from Import a File menu. Click Next.
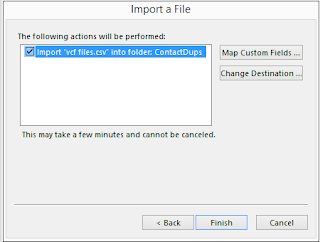
  6. Merge this folder to the primary Contact folder and paste it in the original position.
  7. Click Finish.
NOTE: The above method supports Outlook version >> 2016,2013, 2010
For Outlook 2007, perform the following steps:

  • Select the Duplicate Folder in Contacts.
  • Click Current View--> Phone List
  • Click View--> Current View-->Customize Current View.
  • Hit Fields-->Modified(under Available Field)-->Add
  • Move up Modified until it gets at the top of Show these fields in this order list
  • Click Ok twice
  • Select all the duplicate contacts by holding CTRL button.
  • Press Delete to delete duplicate contacts in Outlook.

The Perfect Way to Remove Duplicate Contacts in Outlook Quickly

What if you have multiple PST Files to delete duplicate Outlook Contact items?? Removing it by Outlook can be tedious as the process is quite time-consuming. And what if your Outlook is bundled with thousands of contacts?? Deleting bulk PST Files manually is quite exhausting.

So here, I came up with a quick solution to clean up duplicate contact items from Outlook 2016, 2013, 2010 & 2007. Try SysTools Outlook Duplicate Remover for easy removing of duplicacy in your Outlook contact items.

The software has an option to clean up duplicate contacts in bulk. You can add multiple PST Files of any file size to remove duplicate contacts in Outlook with other items. The tool will export two reports so that you can differentiate your duplicate as well as unique outlook contact items.

You just need to perform simple steps:
  1. Open PST Duplicate Remover Tool. Click Add File or Add folder according to your need. If you have single PST file click on Add File, or if you have multiple PST File click on Add folder.
  2. Click the category Contacts.
  3. Choose the Duplicate option, whether you want to remove duplicates within the folder or across a folder of Outlook 
  4. Choose the desired location to save your unique PST Files by clicking on the Destination path
  5. Click on Remove Duplicates.
  6. You will get two reports generated in the .csv extension. One is final & one is unique. View your deduplication status of unique file.

Conclusion

The blog covers the complete solution on how to remove duplicate contacts in Outlook 2016, 2013, 2010,2007 and 2003. Moreover, it discusses the manual method to delete duplicate contacts in Outlook one by one or in a bulk by using Import & export method. You can also remove duplicate contacts using SysTools Outlook Duplicate Remover Tool for quick removing of Outlook Duplicate Contacts.

How to Remove Duplicate Contacts in Outlook 2019 / 2016 / 2013 / 2010 ? Clark Kent 4.5 of 5
Are you worried due to the sudden syncing of Outlook contacts item? Well! Sometimes while importing contacts from multiple sources or whil...