Showing posts with label Exchange. Show all posts

Tuesday, 15 August 2017

How to Recover Deleted Mailbox in Exchange 2013, 2010, 2007, 2003

“Terrible! I was accessing my data in Microsoft Exchange and while deleting some emails, I have accidentally erased few crucial emails too. I just want to free up some space from the server, however, now I am in a big trouble. I have searched every possible way to recover deleted mailbox in Exchange Server 2013, but all my efforts go in vain. I need all the files for some important use as soon as possible. I am sure I am not the only one who has done this mistake. Therefore, I am seeking for the help from those who have gone through the same situation or anybody who can help me out.”

Just like this user, if you have also deleted the mailbox in Exchange Server accidentally or internally and now want them back, then you are on the right place. Here, in the forthcoming section of this blog, we are going to learn a manual solution for restoring a deleted mailbox in Exchange 2010, 2007, 2003. Apart from this, we will also introduce a unique trick to perform this task easily.

Exchange Server Mailbox after Deletion

At the time, the account, which is email-enabled, is removed from the Active Directory of Exchange or in case the erased mailbox is with use of Exchange Management Console, then the deleted or removed mailbox is maintained as the disconnected mailbox. This happens as per the mailbox retention setting. Therefore, users can reconnect the deleted mailbox to the original or other account of user if mandatory. However, it should be noted that:

  • The mailboxes, which have been erased can or cannot show as a ‘disconnected mailbox’ right away, once they have been removed. It may take about few minutes to an hour to appear as a disconnected mailbox. In case, it does not happen, then it can be categorized as a different issue and users can look for other solutions.
  • It is feasible to connect a disconnected mailbox to the account of user only in case the account the mailbox is not associated with it.

How to Connect a Disconnected Exchange Mailbox

Now, to connect a disconnected Exchange mailbox users can opt for various methods such as by using Exchange Management Shell (EMS) in Exchange Server, Exchange Management Console (EMC), and also by using SysTools Exchange EDB Recovery software to recover deleted mailbox in Exchange 2013, 2010, 2007, 2003.

Method 1: Connect Disconnected Mailbox via EMC- For the restoration of Exchange mailbox through EMC; you need perform specific steps as mentioned below:

  • First, open EMC
  • Now, in EMC dialog box, enlarge Recipient Configuration node and after this, select the Disconnected Mailbox node available under it
  • Then, right click on mailbox, which has to be recovered. Click on Connect
  • Next, select the ‘mailbox type’ in the dialog box of Connect Mailbox and then, hit on Next
  • From the dialog box Mailbox Settings in Connect Mailbox, you need to select Existing User and then click on the tab of Browse
  • Then, from Select User dialog box, select account of user to that mailbox has to be synchronized or connected. Once it is done, hit on OK
  • Finally, in the box of Alias, type the name of the mailbox. Then on Next

Now, after following these steps, users can connect those mailboxes that are disconnected.

Limitation: First, it is a time taking process. Another, thing is that it needs some technical knowledge.

Method 2: Connect Disconnected Mailbox via EMS - Now, another method for connecting mailbox, which is disconnected is with the help of EMS. For this, you can use Set-Mailbox syntax as follows:


Drawbacks: Like the above-mentioned manual solution, this approach also has some limitations associated with it. It does not assure a guaranteed solution. Moreover, this also requires knowledge on technical things.

Method 3: Using SysTools Exchange Recovery Software - This is the best way to recover deleted mailbox in Exchange Server 2013, 2010, 2007, 2003. This tool has been designed for the recovery of Exchange EDB files. It also has the potential to recover deleted emails from MS Exchange in an easy manner. The tool can even export the resultant file after the completion of recovery process. Moreover, the software provides the accurate and guaranteed results without any limitations. This is how the tool works:

  • First, run the Exchange Recovery tool in your machine
  • Now, add the EDB file that you want to recover
  • After that, preview all the emails as well attachments (Even the deleted emails will be displayed)
  • Finally, you can even export the resultant file to Windows Live Mail, PST, or Office 365

To Sum It Up

After considering the need to recover deleted mailbox in Exchange Server 2003, 2007, 2010, 2013, we have discussed manual methods in the above blog. Without any doubt, manual solutions are easy to find, but always associated with some drawbacks. Considering this, we have also come up with an alternative method, which is using SysTools Exchange recovery software. It is an easy and simple approach to perform the entire procedure.

How to Recover Deleted Mailbox in Exchange 2013, 2010, 2007, 2003 Clark Kent 4.5 of 5
“Terrible! I was accessing my data in Microsoft Exchange and while deleting some emails, I have accidentally erased few crucial emails too. ...

Thursday, 22 June 2017

Unable to Mount Mailbox Database Exchange 2013, 2010, 2007 – 3 Approach

Unable to Mount Database (hr=0x80004005, ec=1108)

Sometimes while working on MS Exchange 2010, a user might delete some log files that have not been written to the respective database yet. This kind of situations can give rise to the serious errors in Exchange Server. One such error message is unable to mount mailbox database in Exchange 2013, 2010 and 2007. This error mainly occurs when a user tries to mount the database.

In additional, the another possible reason behind this error can be a dirty shutdown of the system. Whenever there is a dirty shutdown, a user may lose access to important log files that further give rise to corruption in the Exchange database. All these types of situations make it difficult for a user to access the database files and a user needs to suffer from a data loss. Thus, it is really important for any user to fix unable to mount database (hr=0x80004005, ec=1108) error message to get access back to the database without any problem.

Type of Error Message:

While mounting database to Exchange Server 2013, 2010 and 2007, a user may encounter following error message:


Why Unable to Mount Mailbox Database in Exchange Error Occur?

There can be various possible reasons behind this error in Exchange and all of them are discussed below:

  • One of the major cause behind this error is abnormal termination of an application or a dirty Shutdown.
  • Deletion of the log files that has not been written to the database yet.
  • Corruption in the database of Exchange Server 2013, 2010, 2007.

To overcome all these situations there are some resolution steps that a user must follow before directly jumping to the recovery of Exchange database or log files.

Resolution 1: Check and Repair the Database

If corruption in the database is the reason behind this error, then a user first need to check the database and then take it out of the dirty shutdown state. Thus, to repair the data run the following commands: eseutil /p

"C:\Program Files\Microsoft\Exchange Server\V14\Mailbox\Mailbox Database\Mailbox Database12.edb"

After executing the command, re-run the database again and check the output state. If it is a Clean Shutdown, then a user can mount the database. However, if the mounting process does not go well, they check the database logs.

Resolution 2: Check & Repair the Database Logs

While checking the Exchange Logs do not forget to specify E00 as the starting sequence for the logs and run the following: eseutil /ml

"C:\Program Files\Microsoft\Exchange Server\V14\Mailbox\Mailbox Database\E00"

It will display the list of all logs with their state, a user may receive an error. However, if there is no problem with log files, then a user need to proceed further to resolve this error.

Methods to Fix Unable to Mount Database in Exchange Issue

In order to resolve failed to mount mailbox database in Exchange 2013, 2010 and 2007 error, one can follow any of the three methods, including professional solution are discussed below:

Approach 1: Execute the Command Setup /PrepareAD

A user can run the Setup /Prepare AD command from the CD of Exchange Server to ready the Active Directory service for Exchange Server 2010.This command will repair and recover the Exchange Server configuration in Active Directories automatically. To do the same, follow the steps given below:

In Exchange Server 2010

  • To begin, start the Exchange Server 2010 Help
  • After that, click on the Contents tab and then click on Deployment >> New Installation >> Preparing to Deploy Exchange 2010,
  • Now, click on How to Prepare Active Directory and Domains

Approach 2: Use Domain Controller to add the Exchange Servers group to the "Manage auditing and security log" policy

In order to add Exchange Servers group into the Manage auditing and security log policy, follow the steps listed below:

  • First of all, Log on to the domain controller using account having administrative rights
  • After that, navigate to Start >> Administrative Tools >> Domain Controller Security Policy
  • Now, the Microsoft Management Console (MMC) snap-in the Default Domain Controller Security Setting and expand the Local Policies
  • After this, click on the User Rights Assignment and open Manage auditing and security log from the right pane
  • Now, in the Manage auditing and security log Properties dialog box, click on the Add User or Group option and type DomainNameExchange Servers in the User and group names box, then click OK >> OK option
  • Then, you can exit the Default Domain Controller Security Settings MMC snap-in, and then wait until the security setting propagates across the domain controllers in the domain.
  • After that, you can restart the Microsoft Exchange Information Store service

Approach 3: Using a Professional Tool

The two manual approaches discussed above are not foolproof solutions. There are chances that a user might unable to mount mailbox database in Exchange 2013, 2010 and 2007. Thus, in order to have a guaranteed solution, it is advised to use SysTools Exchange Recovery Tool to remove all type of corruption from Exchange database file. It is the tool that repair Exchange mailbox database without any loss of data. The software has the ability to recover damaged, inaccessible and password protected EDB file and export it to PST file format without any limitation.

The Bottom Line

Inaccessible data in Exchange Mailbox is a big problem for any Exchange Server user. As a user encounter many errors while using Exchange Server 2013, 2010 and 2007 and one such is unable to mount the database. (hr=0x80004005, ec=1011) that is important to resolve. Thus, after understanding the reasons behind the occurrence of this “failed to mount the database error” various solutions are also suggested. A user can refer them easily based on the cause of the error. Moreover, in order to get access back the Exchange mailbox data without any data loss, a third-party tool is also suggested that proves to be a perfect and reliable solution.

Unable to Mount Mailbox Database Exchange 2013, 2010, 2007 – 3 Approach Clark Kent 4.5 of 5
Unable to Mount Database (hr=0x80004005, ec=1108) Sometimes while working on MS Exchange 2010, a user might delete some log files that have ...

Thursday, 11 May 2017

Repair Exchange EDB Database Using ESEUTIL Command or Alternative

Exchange Server has now become one of the major platforms for maintaining the database and performing cross communication. Administrator of Exchange must be aware of ESEUTIL, which is a command-line tool. It is capable of performing the outstanding job in Exchange database by repairing damaged Exchange database. It is the primary method to repair Exchange EDB database issues. Sometimes it fails to fix exchange EDB file, this leads the user to look for another solution. In the upcoming segment, we have brought the method to use ESEUTIL command to repair Exchange mailbox database. Apart from this, in the case of failure of ESEUTIL, users can go for an alternative solution as well.

ESEUTIL: Syntax and Commands

To use the command ESEUTIL, users need to run the command prompt. Once it is done, then type this command on the command prompt ESEUTIL /?

All the switches will appear which can be used with the command along with their purpose. We have mentioned some of the ESEUTIL switches in the following section:

1. Defragmentation: ESEUTIL /d: Discarding the whitespace in the Exchange database to decrease the volume on the disk is defragmentation. For an offline, defragmentation users need to generate a fresh database & then shift users to it. It permits the recovery of whitespace discarded. It differs from the online defragmentation, as online Exchange defragmentation does not allow the recovery of discarded whitespace. This is the syntax used for this purpose ESEUTIL /d option]

Note: It is not recommended to use this command to perform frequent maintenance

2. Integrity: ESEUTIL /g: With this switch it can be verified that if the database of Exchange has any inconsistencies. It can check the ESE level & page level database integrity. The syntax of the command is ESEUTIL /m mode-modifier [options]. It is not possible to check the Application integrity level check with the command.

Here, the filename will be replaced by the name & the path of the file whose integrity you want to check. In place of use any of the following:

  • H:dump database header (default)
  • K:dump checkpoint file
  • L:dump log file or set of logs

3. Recovery: ESEUTIL /r: It is used for restoring internal database consistency. Two kinds of Exchange server recoveries are:

  • Hard Recovery – It happens when the Transaction log replay process happens after the database restoration from online backup. This recovery can be done with Restore mode in ESEUTIL.
  • Soft Recovery – It is done to recover the Exchange data after the unexpected shutdown like a crash of computer system or else forced power down. The syntax for this command is ESEUTIL /r Enn

Here, Enn signifies the log prefix of the log transaction, which you want to play with the data files.

4. File Dump: ESEUTIL /m: This switch shows the database page headers information, space allotment with metadata, file headers, transaction log files & checkpoint files. This is syntax of this command ESEUTIL /m

5. Repair: ESEUTIL /p: This switch repairs a damaged or corrupt offline database of Exchange by clearing that database file that is impossible to repair. The syntax to run this command is ESEUTIL /p

Note: It is suggested to take the backup of the data before the running this command.

6. Checksum: ESEUTIL /k: The command is helpful in knowing the checksum of pages that are present in the log files, checkpoint file & Exchange database. The syntax of this command is ESEUTIL /k

Here, in the filename column enter the name of the file along with the path of that file whose checksum you want to check.

If ESEUTIL Command Fails: SysTools Exchange Recovery is the Solution

ESEUTIL is capable of rectifying minor corruption in the Microsoft Exchange database. Therefore, it is possible that sometimes it fails to work due to a higher level of corruption. In such situations, users can go for a third party tool. One such software that provides guaranteed results is SysTools Exchange EDB Recovery. This ESEUTIL alternative solution repair Exchange mailbox database and can export EDB file to PST effortlessly. It can even recover deleted items from EDB file. Moreover, the tool repairs both the Public, as well as the Private folders of MS Exchange and it, maintains the integrity of the data throughout the complete process. It saves as well load scan Exchange database file for re-scanning the same files. Users can recover dismounted and offline EDB data files and there are no file size limitations to perform the recovery process.

Conclusion

From the above article, we have understood that ESEUTIL is a command to repair corrupt Exchange database. There are different switches in the command to handle out different kind of problems. However, users cannot fully depend on this utility to repair Exchange EDB database, as it does not assure the guaranteed results. Therefore, they can opt for a guaranteed alternative solution by using a third party Exchange repair utility to recover Exchange mailbox from EDB.

Repair Exchange EDB Database Using ESEUTIL Command or Alternative Clark Kent 4.5 of 5
Exchange Server has now become one of the major platforms for maintaining the database and performing cross communication. Administrator of ...

Saturday, 21 November 2015

You do not have Permission to Create an Entry in this Folder

This morning, when I opened my Outlook and tried to access the calendar for some tweaks, my Outlook pops-out the following error message on the screen.

Error Message: You do not have permission to create an entry in this folder. Right-click the folder, and then click properties to check your permissions for the folder. See the folder owner or your administrator to change your permissions.

This error is new for me, as I have been working on this for last 1 year with having all the permission rights to get in this folder.

System Specifications: Connected with Outlook Exchange, Outlook version 2013 and have all the permissions levels.

Solution:


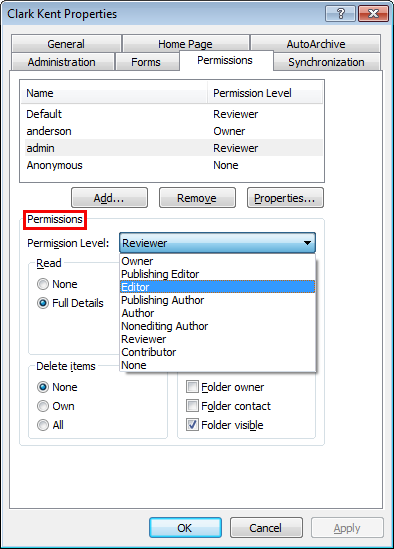
This error message states that the account which you are using to make changes n Outlook does not have enough permission to do the task. At first, you need to set permission level to user in order to gain accessibility of public folder.
Always remember, Outlook must have an administration account to allocate permission levels to various users. In simple words, the account having Owner permission can set permission levels for other users (accounts) in Microsoft Outlook.

Step Setting Permissions to Users: 

1.) Choose the “Folder” to which you want give permission to other users and right click on to head over “Properties” option.


2.) Now, make a click on “Permissions” tab.


3.) Hit on “Add”.


4.) Choose name of the person whom you want to give authentication.


5.) Move mouse over “Permissions Level” section and start deploying the needed authentication to the account.


6.) Once you apply all the authentications, click on “Apply” button.


Are you getting this error, even you have already the permissions:

Sometimes, cached logs of different accounts in a single session, in particular, activity of account that did not have the permission to make changes mess up the things and make the Outlook to arouse the error. As a solution, just re-start the Microsoft Outlook and things will be worked flawlessly.

You do not have Permission to Create an Entry in this Folder Clark Kent 4.5 of 5
This morning, when I opened my Outlook and tried to access the calendar for some tweaks, my Outlook pops-out the following error message on...

Monday, 5 October 2015

There is No Encrypted Link Available, Please Try an Un-encrypted Link

Is it not an awful situation, when you try to add a Gmail account with Outlook and instead of download emails Outlook starts arousing error message on the screen. And this time, error is not signaled towards any wrong input server settings which are believed as usual cause behind synchronization errors in Outlook.To get this done well, you try to again re-check and hit next twice to finalize the configuration.

But, Outlook baffled you with a different error message and that is:

Error Message:There is no encrypted link available, please try an un-encrypted link


Even, I had not heard ever about it but get asked about it on a discussion community a few days back and then I started looking over the facets on why Outlook generates this error.

Key points to concerned about this error message are:
1.) It can be evoked whether you are trying to sync a POP3 account or IMAP account.
2.) Generally encountered while workout with auto-account setup.
3.) Such error message can be also raised while connection with Exchange Server.


Cause:
First of all, never reckon that this happened because of failure of encryption or the account connection which you are trying to configure does not woo support encryption (Especially, in the case of Gmail because it is known for its vigor encryption policy over emails). Preparatory analysis on this error tells that radical cause behind this error is auto-account setup, which fails to determine what server settings it should have used to establish a constant connection. In other words, when you let Outlook to do their configuration process automatically it sometimes finds incomplete information in DNS record and therefore causes such bug.So, go back and choose the “Manual Configure Server Settings” check-box, which shows up whist adding a account in Microsoft Outlook.

The other factor, which you should muse about is 2-Step verification possessed by your Gmail account. Many users have also found breaking out 2-step verification from their Gmail is likely the best alternative solution.

To clear the above given fixes up, I am going to put it the methods in more detailed manner:

Choose Manual Configure Server Settings
1.)If you got this message already, then click on “Back” button and mark the “Manual Configure Server Settings”check-box.
 

2.) Once you do this, hit on “Next” button and start inputting the staple details like email address, password, etc.


3.) Move your cursor to the right corner and make a click on “More Settings” option. Once Outlook induces a new screen, ensure all other settings of MS Outlook are accurate if they are not, then re-check them.

Note: In particular, cross check the incoming and outgoing server details twice before moving ahead.

4.) To get all things done in proper manner, finally hit on “Next”button and wait for a while of completion.


Also, know detailed information about How to Configure an Account in Outlook.

Remove 2-step verification from Gmail Account 

1.) Log-in into your Gmail account click on “My Account” button.


2.) Go to first tab, called “Sign-in security” and choose “Device Activity & Notification”.


3.) The last click will derive you on another and here you have to turn on “2-Step Verification”. Once you hit on it, then you will jump on another page.


4.) Hit on “Start Setup” button and afterward input your password to proceed further.

5.) Now Gmail will ask about your number and type of method (Text Messages &Voice Call) through which it can send you codes in nearby future.Select the one which you seem right and
Please give your feedback on comments box and feel free the ask further. !!!
There is No Encrypted Link Available, Please Try an Un-encrypted Link Clark Kent 4.5 of 5
Is it not an awful situation, when you try to add a Gmail account with Outlook and instead of download emails Outlook starts arousing err...