


Introduction:
From office to home, mobile to tablets, and PCs to laptops everywhere we are using emails. The practice is continued with Gmail, Yahoo mail, Hotmail, and others. There are some jargons related to the arena of email messaging that must be known to everyone. Here, we will be discussing about some of the most common protocols used while setting up new email accounts and understand the difference between them. These protocols are, IMAP and POP. The two protocols used for downloading mails from mail server on the systems, so that we can access it on our mail accounts. Both of these protocols allow people to access their emails on a remote server.Let’s Know More About The Terms
- POP:
POP protocol was developed in the year 1984 and was referred to as Post Office Protocol. It requires the use of user name & password to fetch all the emails from servers, download them and then usually delete them from the Remote Server. Any action taken on one device will not affect the others.
Upgraded Versions:
- POP2
POP was updated in 1985 and was referred as POP2. Included the feature of commands and replies and allows downloading only one message at a time.
- POP3:
Released in 1988, POP3 is the most recent version of a standard protocol for receiving e-mail. It works on the principle of ‘store-and-forward’ service. It is designed to delete mail from the server after downloading it.
Applications:
1. Useful for those who regularly backup their data or files on their hard drive in order to maintain emails for retrieval2. Downloads a large number of messages at a time
3. Mistaken deletion of email from a Remote Server is not an issue as its copy is available on the others
Drawbacks:
1. We have to delete or save same email on different devices2. Logging into any other device or application increases the unread mail count, without the indicating read, flagged or deleted files
3. We have to organize or create folder on every device because it will not be replicated on the others
- IMAP:
IMAP was developed in 1986 and was referred to as the ‘Internet Message Access Protocol’. It allows users to store email on remote servers. It works on a two-way protocol and is helpful for synchronizing email actions on different devices. Actions occur across all devices simultaneously in IMAP. It is a Multi-purpose Internet mail extension and is allowed in management mailboxes, for an increase in the number of functions.
Upgraded Versions:
- IMAP2:
IMAP2 was introduced in the year 1988, and it includes the command and response-tagging pattern.
- IMAP3:
IMAP3 was introduced in the year 1991 and it includes the proposed modifications of IMAP2. IMAP3 was not particularly famous in the marketplace.
- IMAP2bis:
IMAP2 was introduced in 1993 to develop and supports MIME body structures and adds mailbox management functionality (create, delete, rename, message upload), the feature which was absent from IMAP2. This version revision was called as IMAP2bis.
- IMAP4:
IMAP2 was introduced in 1996 and it uses both encrypted and plain text passwords for login purposes. It was same as IMAP2bis; so the IMAP Welfare Group decided to rename IMAP2bis to IMAP4 to avoid any confusion.
Applications:
1. Allows users to synchronize mail and work on different devices simultaneously, having a backup stored on the remote server.2. Added security email with encrypted content offers business users and professions that demand confidentiality offer users to secure files.
3. After Internet connection is re-established, any offline changes made to email are transmitted to the Remote Server.
Drawbacks :
1. A client potentially consumes large amounts of server resources while searching massive mailboxes.2. IMAP4 clients need Internet connection to the IMAP server in order to receive a new mail.
Switching From POP to IMAP:
1. Gmail Outlook 20102. Log into Gmail account
3. Open the Settings panel
4. Click on the Forwarding and POP/IMAP tab

5. Verify IMAP is enabled and save changes.
6. Open Outlook 2010

7. Click on the next
8. Go to the Add new account window
9. Enter in your name, email address, and password twice then click Next
10. Outlook will configure the email server settings check your mails from outlook 2010
Manually Configuring IMAP Settings
Manually configure the settings when the above instructions don't work.1. Go into Auto Account Setup and select Manually Configure Server Settings or Additional Server Types
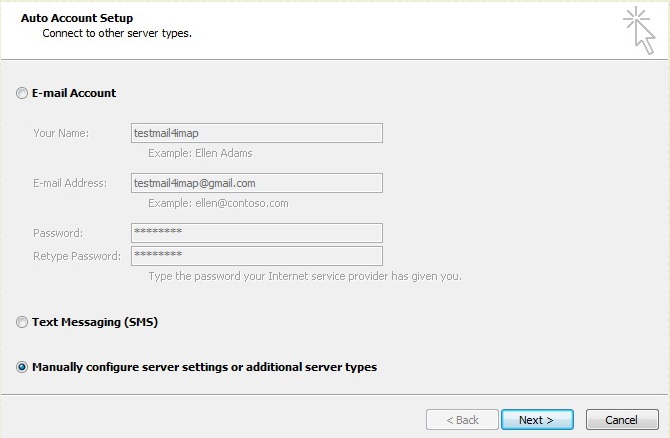
2. Click Next.
3. Select Internet E-mail.

To connect to POP or IMAP server to send and receive e-mail messages.
Now, manually enter the settings.
Under Server Information section, verify the following:
1). Account Type: IMAP
2). Incoming Mail Server: imap.gmail.com
3). Outgoing Mail Server (SMTP): smtp.gmail.com
4). For Google Apps account, enter the full email address (user@yourdomain.com) in the Your Name and User Name fields.

5). Click on the More Settings button
6). In the Internet E-mail Settings screen
7). Click on the Outgoing Server tab, and tick the checkbox next to My Outgoing Server (SMTP) Requires Authentication

8). In the same window, click on the Advanced tab and verify the following
Incoming Server (IMAP): 993 or 143
Incoming Server Encrypted Connection: SSL
Outgoing Server Encrypted Connection: TLS
Outgoing Server (SMTP): 25 or 465.

9). Click OK when finished
Steps to import your old POP mail into IMAP
1). Click on File tab.
2). Click Open.
3). Click Import.
4). In the Import and Export Wizard.
5). Click Import from another program or file, and the click Next.
6). Click Outlook Data File (.pst).
7). Click Next.
8). Click Browse.
9). Choose the file to import.
10). Under Options.
11). Click Do not import duplicates.
12). Click Next.
13). If a password was assigned to the Outlook Data File (.pst), please enter the password.
14). click OK.
15). Import items in Personal Folders, Outlook Data File, or your email address is selected automatically.
16). Include sub folders is selected by default.
17). The default select Import items into the same folder.
18). Click Finish.
19). Delete your old POP account from Outlook, otherwise they will continue to receive email in the old POP account.
20). Right click on your old POP account and select Remove.
21). Now continue to work with the IMAP account.
Configuring Up The Sent Folder Properly.
1). To open your IMAP account settings.
2). Click on File. Then on Account Settings double click on the IMAP account.

3). Press on More Settings.


5). Enable the option Save Sent Items in the following folder on the server.
6). Select the folder where we have to store the Sent Items.
Conclusion:
POP has become outdated, but a lot of us still use it because we don't know how to switch to IMAP. Therefore, the above article deals with discussing about the better one between POP and IMAP, and tells the procedure to switch over to IMAP from POP too.


0 comments:
Post a Comment